

One missed brake defect. One cracked tire. One burned-out headlight. Any of these can pull you off the road, slap you with a fine, or cause a deadly crash. The Federal Motor Carrier Safety Administration (FMCSA) reports that brake-related issues remain the number one reason for out-of-service violations — year after year.
A reliable pre trip inspection checklist is what stands between you and a roadside disaster.
This guide walks you through every step of a proper pre-trip inspection for 2026. It covers Class A and Class B CDL vehicles. You’ll learn what to check, the correct order, and how to avoid the mistakes that fail drivers during CDL skills tests and DOT roadside inspections.
You can also download a free CDL pre trip inspection checklist PDF or use our custom checklist generator at the bottom of this page.
Whether you’re a new CDL student preparing for your skills test or a veteran truck driver logging 100,000 miles a year, this resource keeps you compliant and safe every single trip.
📌 Key Takeaways
- Federal law under 49 CFR § 396.13 requires a pre-trip inspection before every trip.
- A thorough pre trip inspection checklist covers 7 major areas of your vehicle.
- Class A, Class B, and semi truck inspections share most items — but coupling systems differ.
- Skipping your inspection can lead to fines up to $16,000 per violation for carriers.
- Download our free PDF checklist or generate a custom version below.
What Is a Pre Trip Inspection?
A pre trip inspection is a systematic check of your commercial motor vehicle (CMV) before you drive it. You inspect the engine, brakes, tires, lights, steering, coupling devices, and safety equipment.
The goal is simple. Find problems before you hit the road — not after.
Every CDL holder must perform this inspection. It doesn’t matter if you drive a semi truck, a bus, a dump truck, or a delivery vehicle. If it requires a CDL, it requires a pre-trip inspection.
This is not optional. It’s federal law.
How Long Does a Pre Trip Inspection Take?
A proper inspection takes 15 to 30 minutes for experienced drivers. New drivers may need 30 to 45 minutes. Rushing it defeats the purpose. A few extra minutes now can save you hours of roadside delays — or worse.
Why Federal Law Requires It
The FMCSA created clear rules about vehicle inspections. Under 49 CFR § 396.13, drivers must be satisfied their vehicle is in safe operating condition before driving it.
Here’s what happens when drivers skip inspections:
- Fines: Civil penalties can reach $16,000 per violation for carriers and over $4,000 for individual drivers.
- Out-of-service orders: A DOT officer can shut your truck down on the spot.
- CSA score damage: Violations hit your carrier’s safety score for 24 months.
- Liability risk: If a crash happens because of a defect you missed, you carry the blame.
Your vehicle inspection report is a legal document. It proves you checked your rig. No report means no proof — and that’s a problem during any DOT truck inspection.
⚠️ Important: You must also review the previous driver’s post-trip inspection report (DVIR) before starting your own inspection. Learn more about the post trip inspection and DVIR process.
Complete 2026 Pre Trip Inspection Checklist
Below is the full pre trip inspection checklist broken into seven major zones. This covers Class A tractor-trailer combinations. Class B drivers can skip the coupling section.
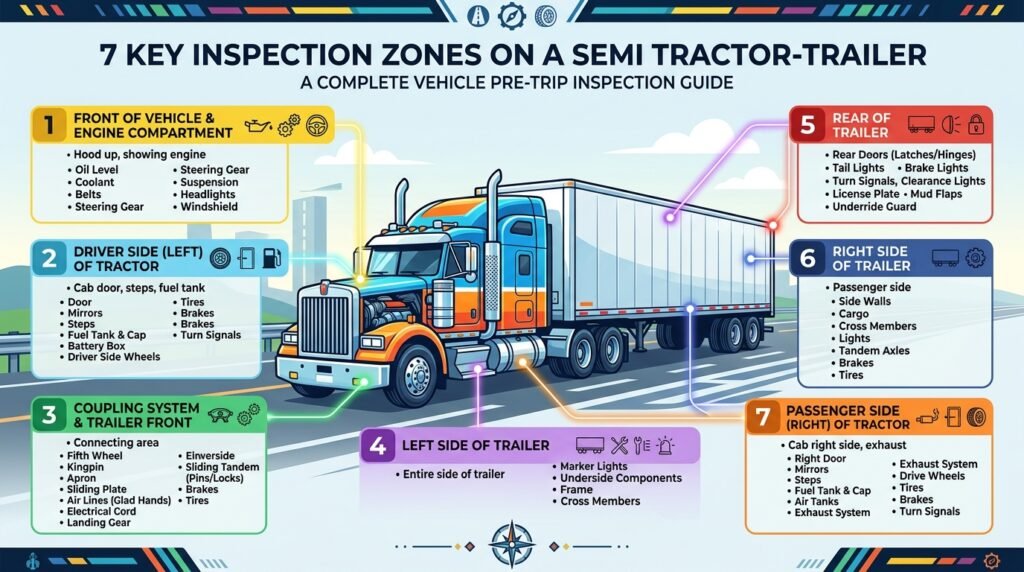
1. Engine Compartment
Open the hood (or tilt the cab) and check these items:
| Component | What to Check |
|---|---|
| Engine oil | Level, leaks, condition |
| Coolant | Level in reservoir, leaks at hoses and connections |
| Power steering fluid | Proper level, no leaks |
| Belts | Cracks, fraying, proper tension |
| Hoses | Bulges, cracks, secure connections |
| Wiring | Secure, no exposed wires, no burn marks |
| Air compressor | Mounted securely, belt-driven connection |
| Water pump | No leaks, secure mounting |
| Alternator | Mounted securely, wiring connected |
| Steering gear box | No leaks, mounting bolts tight |
Pro tip: Look under the truck for fresh puddles. Spots on dry pavement tell you something is leaking before you even open the hood.
2. Cab and Controls — Inside Check
Climb into the cab and inspect the following:
- Parking brake — Set and holding
- Seat belt — Latches securely, no fraying
- Mirrors — Clean, properly adjusted, no cracks
- Windshield — No illegal cracks, clean
- Wipers and washers — Working, blades in good condition
- Dashboard gauges — Oil pressure, coolant temp, voltmeter, air pressure all reading normal
- Horn — Loud and working
- Heater/defroster — Functional
- Emergency equipment — Fire extinguisher (charged, accessible), reflective triangles, spare fuses
Air Brake Check (Critical)
If your vehicle has air brakes, perform these tests inside the cab:
- Build air pressure to governor cut-out (typically 120-140 psi).
- Turn off engine. Air pressure should not drop more than 3 psi in one minute (single vehicle) or 4 psi (combination).
- Fan brakes down. The low-air-pressure warning should activate before 60 psi.
- Continue fanning. The spring brakes (parking brake) should pop out between 20-45 psi.
- Test service brakes. Build pressure back up, release parking brake, move forward slowly, apply brakes firmly. The vehicle should stop straight without pulling.
Note: Failing the air brake check is an automatic failure on a CDL skills test and a guaranteed out-of-service violation during a DOT roadside inspection.
3. External Walk-Around — Driver Side
Step outside and begin your walk-around on the driver’s side:
- Door — Opens, closes, latches securely
- Mirror and brackets — Secure, clean, no damage
- Fuel tank — Cap secure, no leaks, tank mounted properly
- DEF tank (if equipped) — Level adequate, cap secure
- Frame — No cracks, bends, or missing bolts
- Exhaust system — Secure, no leaks, proper routing (no contact with wires or fuel lines)
- Drive shaft — No damage, U-joints secure
Tire and Wheel Inspection
Check every tire and wheel on the driver side:
| Item | What to Look For |
|---|---|
| Tire pressure | Properly inflated (use gauge or thump test) |
| Tread depth | Minimum 4/32″ on steer tires, 2/32″ on others |
| Tire condition | No cuts, bulges, tread separation |
| Lug nuts | All present, no rust trails (signs of looseness) |
| Hub seals | No leaks |
| Rims | No cracks, bends, or welding repairs |
| Valve stems | Not damaged, caps in place |
4. Front of Vehicle
Stand in front of the vehicle and check:
- Headlights (low and high beam) — Working, clean, not cracked
- Turn signals — Working, proper color (amber)
- Clearance/marker lights — Working, clean
- License plate — Visible, clean, current registration
- Bumper — Secure, not damaged
- Steering components (visible from front) — No loose or damaged parts
5. External Walk-Around — Passenger Side
Repeat the same checks from the driver side:
- Mirror and brackets
- Fuel tank (if applicable)
- Frame and body
- Tires and wheels (every axle)
- Exhaust components
- Mud flaps/splash guards
Also check:
- Battery box (often on passenger side) — Secure, no corrosion, cover in place
- Cargo securement — Doors closed and latched, cargo properly distributed and secured
6. Rear of Vehicle
Walk to the back and inspect:
- Taillights — Working, clean, red
- Brake lights — Working (have someone press the pedal or use a tool to hold it)
- Turn signals — Working, proper color
- Reflectors — Clean, not cracked
- License plate light — Working
- Mud flaps — Present, proper length, not dragging
- Rear doors — Latched, sealed
- ICC bumper (rear impact guard) — Secure, no damage, within 30 inches of ground
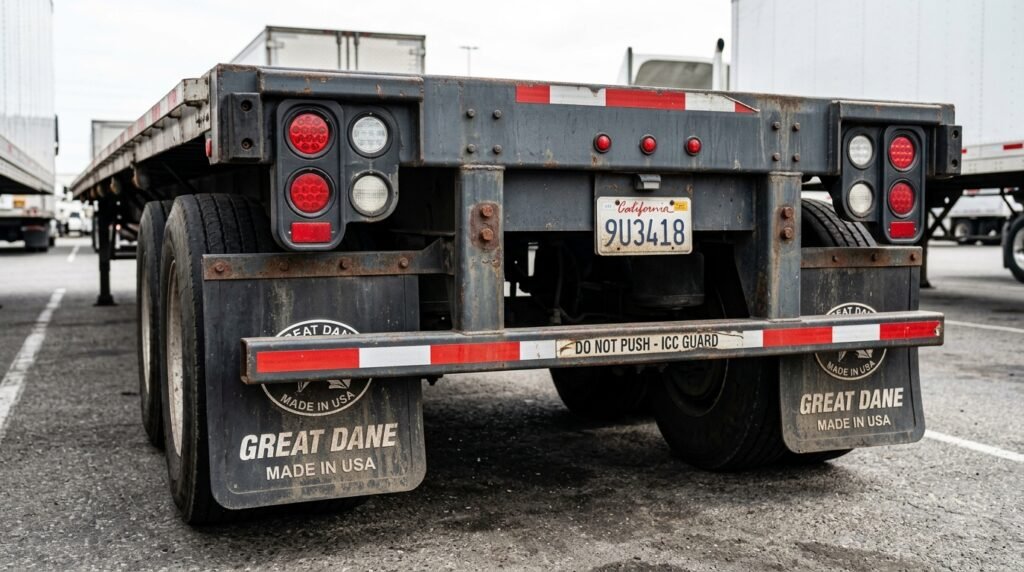
7. Coupling System (Class A Only)
For tractor-trailer combinations, inspect the fifth wheel and coupling:
- Fifth wheel — Mounted securely, no cracks, properly greased
- Locking jaws — Closed around kingpin, lock engaged
- Release handle — In locked position, safety latch engaged
- Mounting bolts — All present and tight
- Kingpin — Not bent, not cracked
- Apron/skid plate — Not damaged
- Air and electrical lines — Connected, no leaks, no damage, enough slack for turns
- Sliding fifth wheel (if equipped) — Locked in position, pins engaged
- Landing gear — Fully raised, handle secured, no damage
Warning: An improperly coupled trailer can separate from the tractor while driving. Always tug-test after coupling.
Pre Trip Inspection Class B Checklist
A pre trip inspection class B checklist covers many of the same items as Class A — minus the coupling system. Class B vehicles include straight trucks, buses, dump trucks, and large single-unit vehicles.
Here’s what differs for Class B:
| Class A (Tractor-Trailer) | Class B (Single Unit) |
|---|---|
| Fifth wheel coupling inspection | No coupling — skip entirely |
| Trailer air/electrical lines | No trailer connections |
| Trailer landing gear | No landing gear |
| Dual trailer axle check | Fewer axles (varies by vehicle) |
| Trailer body/doors | Cargo body/doors on the single unit |
Everything else stays the same. Engine compartment, cab, brakes, tires, lights, and external walk-around checks apply equally.
If you’re studying for your CDL, most CDL training programs teach the pre trip inspection class B checklist first because it’s simpler. Then they add coupling system knowledge for Class A upgrades.
Step-by-Step Inspection Process
Knowing what to check is half the battle. Knowing the order makes you efficient and thorough. Here’s the proven seven-step flow used by experienced drivers and CDL examiners:
- Approach the vehicle. Look for leaks under the truck. Check the overall condition. Note anything unusual.
- Open the engine compartment. Check all fluids, belts, hoses, and components listed above. Close the hood securely.
- Enter the cab. Adjust your seat and mirrors. Check all gauges and controls. Perform the full air brake test.
- Turn on all lights. Headlights, flashers, and clearance lights.
- Start the external walk-around. Begin at the driver-side door. Work your way around the vehicle in a consistent direction. Check the front, passenger side, rear, and return to the driver side.
- Check the coupling (Class A only). Inspect the fifth wheel, kingpin, airlines, and electrical cord.
- Final brake test. Move forward slowly and test service brakes before entering traffic.
Write down any defects on your Driver Vehicle Inspection Report (DVIR). If a defect affects safety, do not drive the vehicle until it’s repaired.
Following truck driver safety tips like this consistent routine can prevent breakdowns and keep you compliant.
DOT Pre Trip Requirements You Must Know
DOT pre trip requirements come from multiple federal regulations. Here are the key rules every CDL holder should know in 2026:
49 CFR § 396.13 — Driver Inspection
This rule requires you to:
- Review the last DVIR before driving
- Sign the DVIR to acknowledge you reviewed it
- Be satisfied the vehicle is safe before operating it
- Report any new defects at the end of your trip
49 CFR § 392.7 — Parts and Accessories
You cannot drive a CMV unless the required parts and accessories are in proper working order. This includes:
- Lighting devices
- Reflectors
- Brakes
- Horn
- Windshield wipers
- Mirrors
- Coupling devices
- Tires
49 CFR § 392.8 — Emergency Equipment
Every CMV must carry:
- A properly charged fire extinguisher
- Spare fuses (unless the vehicle has circuit breakers)
- Three reflective warning triangles
Penalties for Non-Compliance
| Violation Type | Potential Fine |
|---|---|
| No DVIR completed | Up to $1,590 per violation |
| Operating with known defects | Up to $16,000 per violation |
| Brake out-of-service condition | Immediate OOS order + fines |
| Missing emergency equipment | Violation + CSA points |
🚨 2026 FMCSA Penalties
| Violation | Fine (2026) |
|---|---|
| No DVIR | $1,584 |
| Known defects | $19,246 (carriers) |
| Brake OOS | $23,647 + shutdown |
| No emergency gear | $1,584/item |
Building a strong fleet safety program starts with consistent daily inspections. Companies that enforce pre-trip inspections see fewer roadside violations and lower insurance costs.
CDL Pre Trip Inspection Checklist PDF — Free Download
We created a free, printable CDL pre trip inspection checklist PDF you can keep in your cab. It covers:
- ✅ All 7 inspection zones
- ✅ Class A and Class B versions
- ✅ Air brake test steps
- ✅ Coupling system check
- ✅ Space to record defects
- ✅ DVIR-ready format
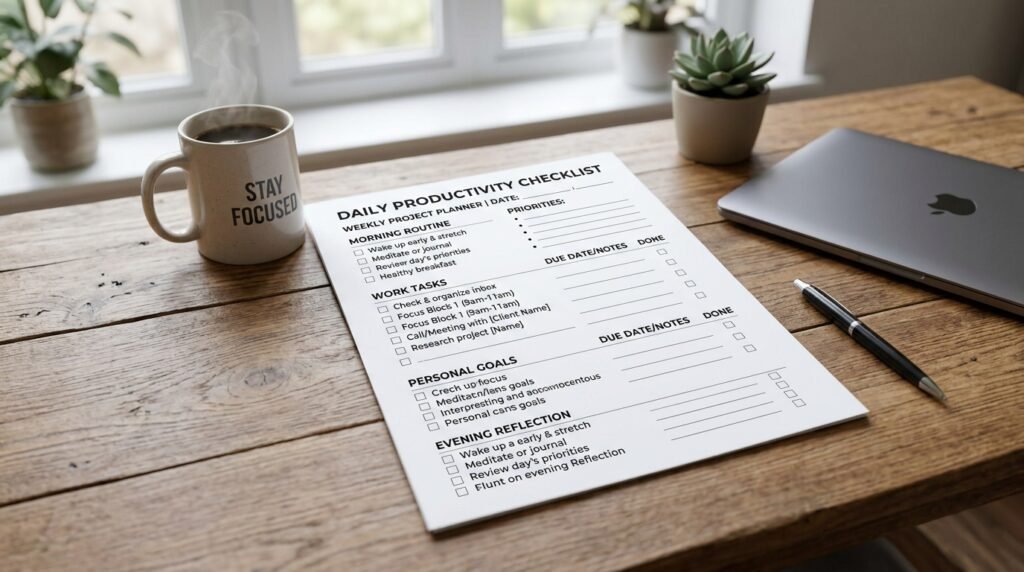
📥 [Get the 2026 Pre Trip Inspection Checklist PDF — FREE]
You can use our custom checklist generator tool at the bottom of this article to create a personalized version for your specific vehicle type.
7 Common Mistakes That Fail Drivers
Whether you’re taking a CDL skills test or facing a DOT roadside inspection, avoid these errors:
1. Rushing the inspection.
Examiners and DOT officers notice when you skip steps. Take your time.
2. Forgetting the air brake test.
This is the most failed section on CDL pre trip exams. Practice the sequence until it becomes automatic.
3. Not checking both sides.
Every tire, every light, every mirror — on both the driver and passenger sides.
4. Ignoring the coupling system.
Fifth wheel defects cause trailer separations. Never skip this check on a Class A vehicle.
5. Missing emergency equipment.
No fire extinguisher? That’s an automatic violation.
6. Not looking under the vehicle.
Leaks, hanging parts, and damaged components hide under the truck. Get low and look.
7. Failing to document defects.
Finding a problem is only half the job. Writing it down on your DVIR completes it.
Practicing defensive driving for truckers goes hand-in-hand with proper vehicle inspections. A well-maintained truck is easier to control.
How to Pass Your CDL Pre Trip Test
The CDL pre trip inspection test requires you to walk around the vehicle and explain what you’re checking and why to the examiner. Here’s how to prepare:
Use the “Point, Name, Explain” Method
For each item:
- Point at the component
- Name it clearly
- Explain what you’re checking for
Example: “This is the power steering fluid reservoir. I’m checking that the fluid level is full and there are no leaks at the hoses or connections.”
Study by Zone
Don’t try to memorize a random list. Learn the inspection zone by zone:
- Engine compartment → Cab → Driver side → Front → Passenger side → Rear → Coupling
This matches the walk-around flow. It keeps you organized during the test.
Practice on a Real Vehicle
Reading a checklist helps. Practicing on an actual truck or bus makes it stick. Most CDL training programs provide hands-on practice vehicles.
Know Your Air Brake Numbers
Memorize these critical thresholds:
| Test | Required Standard |
|---|---|
| Governor cut-out | 120-140 psi (typical) |
| Air leak rate (single) | No more than 3 psi/minute |
| Air leak rate (combination) | No more than 4 psi/minute |
| Low air warning | Must activate before 60 psi |
| Spring brake pop-out | Between 20-45 psi |
✅ 2026 CDL Air Brake Test
| Test | Single Vehicle | Combination |
|---|---|---|
| Governor cut-out | 120-140 psi | 120-140 psi |
| Air leak rate | ≤3 psi/min | ≤4 psi/min |
| Low air warning | Before 60 psi | Before 60 psi |
| Spring brakes | 20-45 psi | 20-45 psi |
Pre Trip Inspection Checklist Generator Tool
Use this interactive tool to create a custom pre trip inspection checklist for your specific vehicle. Select your vehicle type, check off your items, and print or save your checklist.
🚛 Pre-Trip Inspection & DVIR
Driver Vehicle Inspection Report — FMCSA 49 CFR §396.11 Compliant
🚗 Driver Certification
I certify this vehicle has been inspected per 49 CFR §396.11 and all defects are noted.
🔧 Mechanic / Carrier Certification
Defects corrected or not required to be corrected before operation.
🚦 Next Driver Acknowledgment
I acknowledge receipt of this DVIR. No unsafe defects remain uncorrected.
Frequently Asked Questions
Below are common questions about pre-trip inspections. Each answer is formatted for FAQ schema markup.
A thorough pre trip inspection takes 15 to 30 minutes for an experienced driver. New CDL holders may need 30 to 45 minutes. The time depends on vehicle size and whether you drive a Class A or Class B vehicle. Never rush it — a complete inspection protects your safety and your CDL.
Skipping your inspection violates federal law under 49 CFR § 396.13. You can receive fines, out-of-service orders, and CSA points against your carrier’s safety record. If a crash occurs because of a vehicle defect you missed, you may face personal liability and potential criminal charges.
A pre trip inspection happens before you drive. You check the vehicle to make sure it’s safe. A post trip inspection happens at the end of your shift. You document any defects you found during your trip on the DVIR so the next driver and maintenance team know about them.
Yes. The pre trip inspection is one of three parts of the CDL skills test. You must walk around the vehicle and explain each component to the examiner. Using a structured checklist during your study helps you memorize the correct order and avoid missing items. Download our free PDF above to practice.
A typical CDL pre trip inspection covers 50 to 70 individual items depending on vehicle type. Class A inspections have more items because of the coupling system. The items fall into seven main zones: engine compartment, cab and controls, air brakes, driver side, front, passenger side, rear, and coupling.
Yes. DOT officers can place a vehicle or driver out of service for critical safety violations found during a roadside inspection. Common out-of-service defects include brake failures, tire issues below minimum tread depth, inoperative headlights, and air system leaks exceeding allowable limits.
Conclusion
A solid pre trip inspection checklist is not just paperwork. It’s your first and best line of defense against breakdowns, violations, fines, and crashes. Every CDL driver — whether you operate a semi truck, a bus, or a straight truck — must complete this inspection before every trip.
Here’s what to do next:
- Download the free 2026 pre trip inspection checklist PDF above.
- Use the interactive checklist generator tool to create a custom version for your vehicle.
- Practice the seven-zone walk-around until it becomes second nature.
- Document every defect on your DVIR — no shortcuts.
Stay compliant. Stay safe. Your CDL depends on it.
Need more compliance resources? Explore our guides on Smith System driving and truck accident prevention to build the safest driving habits in the industry.







![DOT Drug Test: What You Must Know in 2026 [Full Guide]](https://compliantdriversprogram.com/wp-content/uploads/2026/03/DOT-Drug-Test-150x150.jpeg)



Leave a Reply